How to Install Drawer Slides: Tools, Tips, and Tricks
Master how to install drawer slides with our complete guide. Essential tools, expert tips, and tricks for smooth-gliding drawers every time.
There's nothing quite as annoying as a drawer that sticks, squeaks, or refuses to close properly. You know the one I'm talking about! That kitchen drawer you've been wrestling with for months, or maybe the dresser drawer that requires a special wiggle-and-shove technique just to open. Well, here's some good news: fixing this frustration is totally within your wheelhouse, even if you've never picked up a power tool in your life.
Installing drawer slides might sound like something best left to carpenters and furniture makers, but honestly, it's one of those satisfying DIY projects that delivers immediate results. Once you understand the basics, you'll wonder why you ever put up with temperamental drawers in the first place.
This comprehensive How to Install Drawer Slides: Tools, Tips, and Tricks guide covers everything from selecting the right slides for your project to achieving that buttery-smooth glide we all dream about. Whether you're building new cabinets from scratch, replacing worn-out hardware, or upgrading basic slides to soft-close luxury, we've got you covered. Roll up your sleeves because those stubborn drawers are about to meet their match!
Understanding Different Types of Drawer Slides
Side-Mount Slides
Side-mount slides are probably what you picture when someone mentions drawer hardware. These classic workhorses attach to the sides of both the drawer and cabinet, creating a reliable track system that's been around for decades. They're visible when the drawer is open, but that's a small trade-off for their straightforward installation process.
These slides come in various weight ratings, from light-duty options suitable for bathroom vanities to heavy-duty versions capable of supporting tool drawers loaded with serious equipment. Side-mount slides work brilliantly for most residential applications and remain the go-to choice for many DIYers because of their forgiving installation process.
Undermount Slides
Want that sleek, furniture-grade look? Undermount slides hide beneath the drawer box, completely invisible when the drawer is open. They create a cleaner aesthetic that high-end furniture and modern kitchens demand. However, and here's the catch, they require more precise installation and typically cost more than their side-mount cousins.
Undermount slides usually feature soft-close mechanisms that prevent that annoying slam. The drawer appears to float in the cabinet, supported by hardware you never see. If you're building custom furniture or renovating with an eye toward resale value, undermount slides are absolutely worth considering.
Center-Mount Slides
Old-school but still kicking around, center-mount slides attach to the bottom center of the drawer. You'll find these in vintage furniture, antique pieces, and some budget cabinetry. They're simple in design but can be tricky to install correctly because the single track must be perfectly centered.
Unless you're restoring period furniture or working with existing center-mount systems, most modern projects benefit from side-mount or undermount options instead.
Ball-Bearing vs. Roller Slides
Within these categories, you'll encounter ball-bearing and roller mechanisms. Ball-bearing slides operate silently and smoothly, handling heavier loads without complaint. They cost more but feel substantially better during everyday use.
Roller slides use plastic wheels that ride along a track. They're budget-friendly and work fine for light-duty applications like bedroom dressers or home office filing systems. However, they can develop annoying squeaks over time and don't handle weight as gracefully as ball-bearing alternatives.
Essential Tools for the Job
Must-Have Equipment
Before starting any drawer slide installation, gather these essential tools. Having everything within arm's reach makes the process smoother and prevents frustrating mid-project hardware store runs.
A quality drill or impact driver tops the list. You'll be driving numerous screws, and doing this by hand is a recipe for sore wrists and crooked hardware. A cordless drill offers the best maneuverability inside cabinet boxes.
A tape measure and pencil seem obvious, but don't underestimate their importance. Precise measurements separate successful installations from wobbly disasters. Grab a combination square too because checking for perpendicular alignment saves headaches later.
A level, preferably a small torpedo level that fits inside cabinet spaces, ensures your slides run true. Even slight angles cause binding and uneven wear over time. Spirit levels built into combination squares can work in a pinch.
Nice-to-Have Additions
A drawer slide jig might seem like an unnecessary luxury, but trust me, once you've used one, you'll never go back. These handy devices hold slides at precise heights while you drill and screw, eliminating the need for three hands.
Clamps in various sizes help hold things steady during installation. Spring clamps work great for temporarily positioning slides while you verify placement before committing to screws.
A flashlight or headlamp proves invaluable when working inside dark cabinet interiors. Seeing what you're doing accurately matters more than most people realize until they're squinting at screw holes in shadowy corners.
Preparation: The Foundation of Success
Measuring Twice (Or Maybe Three Times)
Here's where many DIY installations go sideways: rushing through measurements. The old carpenter's saying about measuring twice and cutting once applies perfectly to drawer slide installation. Actually, measure three times if you're feeling cautious because precision here determines everything.
Measure the depth of your cabinet interior from front edge to back wall. Subtract about an inch to ensure drawer faces don't hit frames when closing. This measurement determines what length slides you need.
Measure drawer box width and cabinet opening width. Calculate the clearance needed on each side based on your chosen slides. Most side-mount slides require half an inch of clearance per side, though specifications vary by manufacturer.
Drawer box height matters too! Your slides need to attach within the drawer's side panel, so verify you have adequate mounting surface before purchasing hardware.
Preparing the Cabinet and Drawer
Remove any existing hardware, old slides, or obstacles from both cabinet and drawer. Fill old screw holes with wood filler if they'll interfere with new mounting positions, then let everything dry completely before proceeding.
Sand any rough spots that might catch on moving hardware. Vacuum or wipe away sawdust and debris because even tiny particles can cause slides to bind or wear prematurely.
Check that your cabinet is square and your drawer box is square. Out-of-square components create installation nightmares that no amount of adjustment can fully resolve. Minor issues can sometimes be shimmed, but significant problems require correction before installation.
How to Install Drawer Slides: Tools, Tips, and Tricks Step by Step
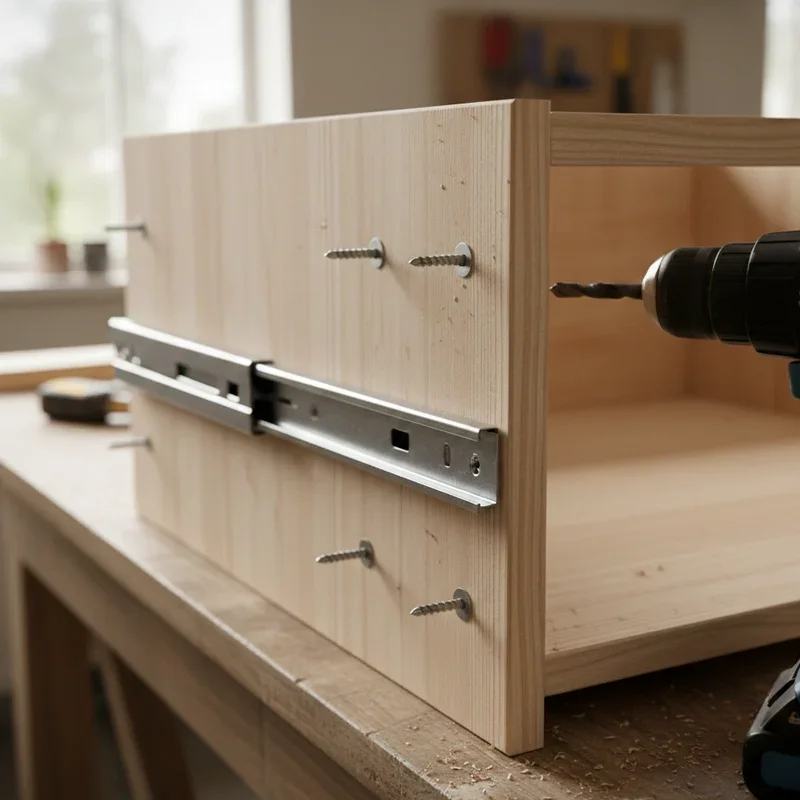
Installing Cabinet-Side Components First
Starting with the cabinet portion typically works best because you have better visibility and access. Position your slide according to manufacturer specifications, usually measured up from the cabinet bottom or down from a reference point.
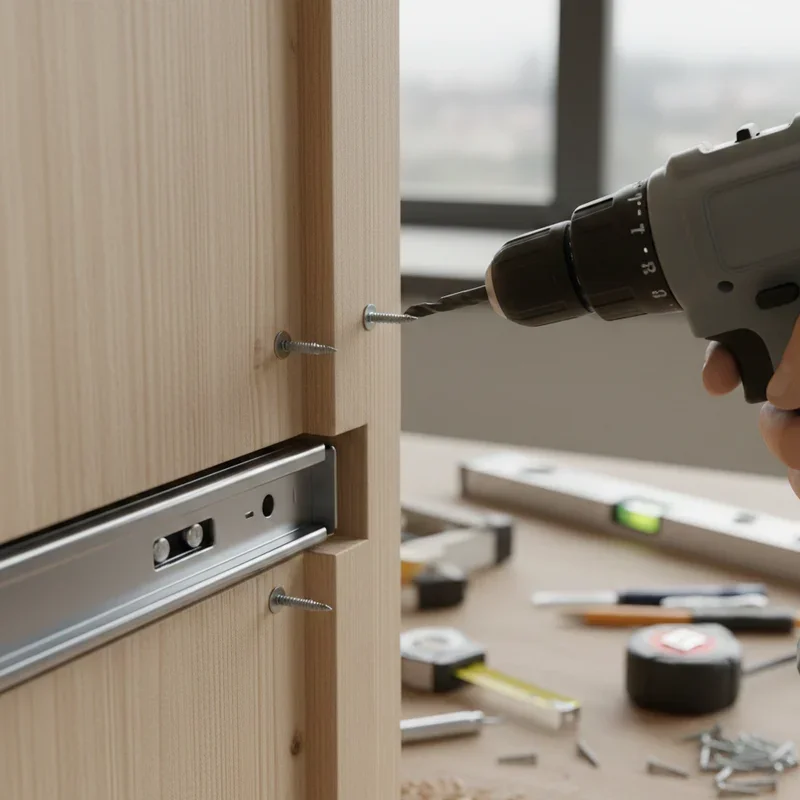
Mark screw hole locations with a pencil or awl. Using an awl creates a small indent that prevents your drill bit from wandering, which is a simple trick that makes a big difference in alignment accuracy.
Drill pilot holes slightly smaller than your screw diameter. This prevents wood splitting and ensures screws bite securely. Drive your screws, but don't fully tighten just yet. Leaving slight play allows fine-tuning during the drawer fitting process.
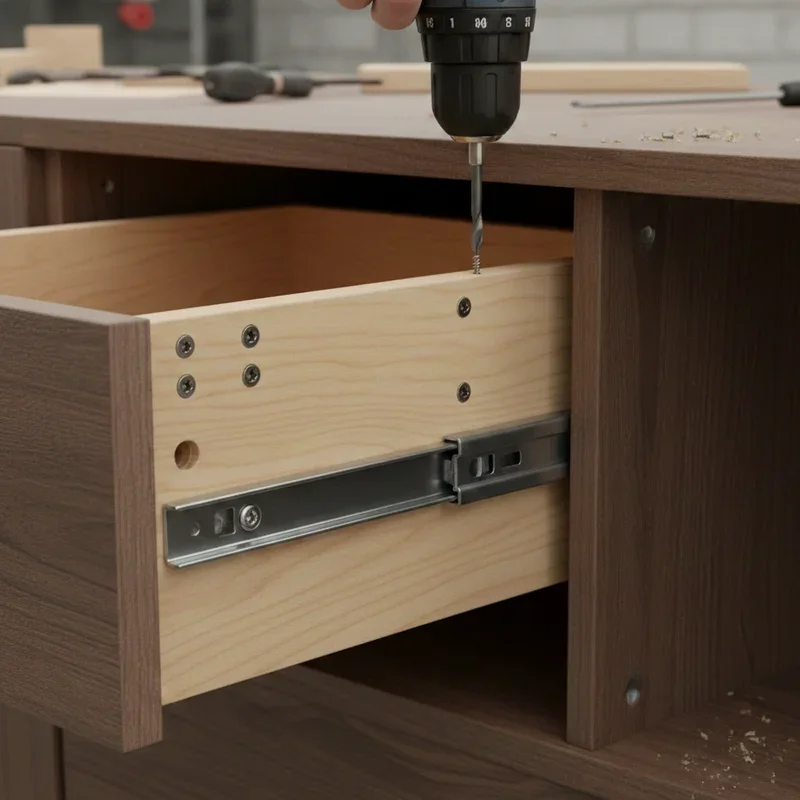
Mounting Drawer-Side Components
Separate the drawer component from the cabinet component if your slides come as two pieces. Many ball-bearing slides feature a release lever that detaches the inner member for easier installation.
Position the drawer component following manufacturer height specifications. Typically, you'll want the slide centered vertically on the drawer side or positioned at a specific distance from the bottom edge.
Clamp or hold the component in position and mark your holes. Drill pilot holes and attach with screws, again leaving them slightly loose for adjustment. Repeat the process on the opposite side, taking extra care to match heights exactly.
The Moment of Truth: Fitting the Drawer
Here comes the exciting part! Carefully align the drawer slides with cabinet slides and push the drawer into place. Quality slides should engage smoothly with a satisfying click when properly aligned.
Test the drawer operation. Does it glide smoothly? Does it close fully without binding? Does it remain level throughout its travel? If yes to all three, congratulations! If not, minor adjustments are likely needed.
Most modern slides feature elongated mounting holes that allow vertical and horizontal adjustment. Loosen screws slightly, reposition as needed, then retighten. Small tweaks often solve binding or alignment issues.
Fine-Tuning for Perfect Operation
Even properly installed slides sometimes need fine-tuning. If your drawer sits crooked when closed, one side likely needs slight height adjustment. Loosen, adjust, and retighten until faces align perfectly.
Drawers that won't stay closed might need their cabinet-side slides adjusted slightly forward. Conversely, drawers that pop open might need slides shifted slightly rearward. These micro-adjustments make the difference between good enough and genuinely excellent.
Once everything operates smoothly, go back and fully tighten all screws. Add any remaining screws to holes you might have skipped during initial fitting. Your slides should now feel rock-solid and operate flawlessly.
Expert Tips for Professional Results
The Spacer Block Trick
Cut a wooden spacer block to position slides consistently across multiple drawers. Rather than measuring each installation individually, simply place your spacer on the cabinet bottom, rest the slide on top, and mount. This technique ensures uniform height across all drawers while dramatically speeding up the process.
Mark your spacer block with what it's for because you'll forget by next weekend. Creating spacers for commonly used measurements saves time on future projects too.
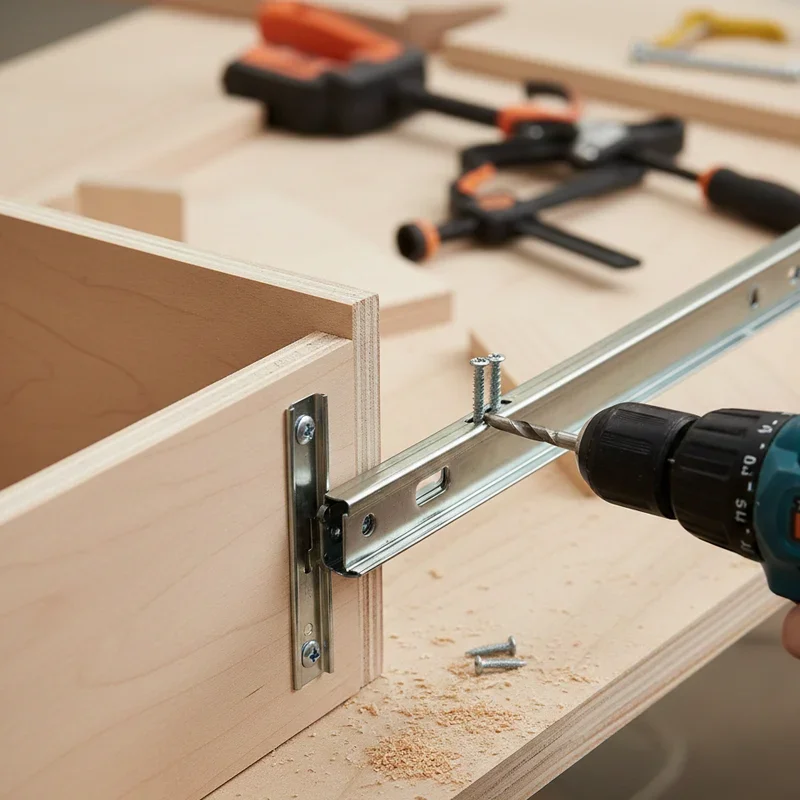
Dealing with Face Frames
Traditional face-frame cabinets require rear-mounting brackets or standoffs to bring slides flush with the cabinet opening. Without these, your drawer would sit too far back, leaving an awkward gap.
Rear brackets attach slides to cabinet backs while supporting the front at face-frame level. Measure carefully because improper bracket placement causes the same problems as improperly mounted slides.
When Shimming Becomes Necessary
Sometimes cabinets aren't perfectly square despite our best efforts. When slides won't align properly due to cabinet irregularities, shimming provides the solution.
Thin cardboard, plastic shims, or even folded paper can build up mounting surfaces to achieve proper alignment. Place shims behind slide mounting points, verify alignment, then secure everything with longer screws that penetrate through shimming material into solid wood.
Common Mistakes and How to Avoid Them
Ignoring Weight Ratings
Those lightweight slides rated for 50 pounds won't handle your collection of cast iron cookware! Always check weight ratings and choose slides that exceed your intended load by a comfortable margin. Drawers loaded near their maximum rating wear out faster and operate less smoothly.
Skipping Pilot Holes
We've all been tempted to skip drilling pilot holes when we're in a hurry. Resist this temptation! Hardwoods split without pilot holes, particleboard crumbles, and even softwoods can crack when screws are driven too close to edges. The extra minute spent drilling prevents installation disasters.
Mismatched Slide Lengths
Slides should extend nearly the full depth of your cabinet for proper support. Using slides that are too short creates drawers that tip when extended, potentially dumping contents or damaging hardware. When in doubt, go with longer slides rather than shorter ones.
Maintaining Your Drawer Slides
Keeping Things Running Smoothly
Quality slides need occasional attention to maintain optimal performance. A drop of light machine oil or silicone lubricant on ball bearings keeps things gliding smoothly for years. Avoid heavy greases that attract dust and gum up over time.
Periodically check mounting screws for tightness. Daily use naturally loosens hardware, and retightening prevents wobbles before they develop into bigger problems.
Clean slides annually by wiping down tracks and removing accumulated dust. This simple maintenance extends hardware life significantly and keeps operation feeling factory-fresh.
Conclusion
Installing drawer slides transforms frustrating, sticky drawers into smooth-operating marvels that make daily life just a bit more pleasant. This How to Install Drawer Slides: Tools, Tips, and Tricks guide has armed you with everything needed for successful installation, from understanding different slide types to mastering fine-tuning adjustments. Remember that patience and precision matter more than speed when mounting hardware that you'll use thousands of times. Take your time, measure carefully, and don't skip those pilot holes. Before long, you'll be upgrading drawers throughout your home and wondering why you waited so long to tackle this satisfying project!
Read next: 15 Quilt Border Ideas to Frame Your Quilt Beautifully
Frequently Asked Questions
1. What size drawer slides do I need for my cabinet?
Measure cabinet depth and subtract one inch for proper clearance and full extension.
2. Can I install soft-close drawer slides on existing cabinets?
Yes, soft-close slides retrofit into most cabinets with standard side-mount or undermount configurations.
3. Why do my newly installed drawer slides stick or bind?
Binding usually indicates misalignment; loosen screws and adjust slide positions until operation smooths out.
4. How much weight can standard drawer slides support?
Standard residential slides typically support 75 to 100 pounds; heavy-duty versions handle much more.
5. Do I need special tools to install undermount drawer slides?
Undermount slides require precise drilling jigs for best results, though careful measuring works too.
Stay up to date with our latest ideas!